The Silverpoint Composite Underdrawing
June 6, 2022
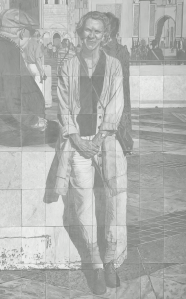
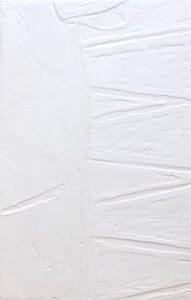
Silverpoint on tinted acrylic ground. 3 1/2 feet wide by 5 1/2 feet tall or 106 cm x 168 cm.
I’ve finally completed the sixty-four silverpoint underdrawings in preparation for a painting – as yet to come. The panels were developed individually – and were based on black and white sectionals of a photograph. The MDF panels were all prepared with an acrylic ground tinted with a mixture of dry pigments to simulate terre verte, because the actual dry pigment, terre verte, reacts negatively with acrylic rendering it unworkable – in that particular medium. Of course, I could have used a tint of white for my ground colour but I already knew how much I enjoyed working from a toned ground. The silver lines could be used to subtly create linear form while then the addition of an acrylic wash of white highlights could help it to “pop”! In addition, I coated each tinted gesso panel with a transparent covering of Golden’s Pastel Ground, in order to create a fuzzy toothiness.
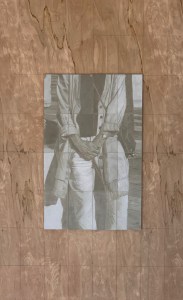
Assembling the panels on the backing board.
Now, since this level has been completed I’ve encountered two main problems-to-solve: 1) in the areas of darkest value which required a lot of cross-hatching of the silver particles, the image possesses a reflective sheen. Is it possible to minimise this reflectivity?; 2) even though silverpoint has the reputation for leaving an indelible mark, I have found that that is not really the case. Both water and a kneaded eraser can, in fact, diminish the image. So, before I proceed any further, I want to “fix” the drawing. What material should I use to do this? A traditional pastel fixative or a matte acrylic varnish? In addition, would this proposed fixative help to diminish my sheen problem?
After some research and consultation with the expert folks at the University of Delaware’s MITRA forum, I have decided to spray an adequate covering of Lascaux (an acrylic medium containing B-72) Fixative over the whole assemblage before proceeding any further. Because I anticipate further layers of abstraction, using a Liquitex transparent titanium white spray over the image my silver sheen issue may take care of itself?
Fast forward to a few months later. The fixative, fixed, and the matte spray pain reduced the sheen.
What remained was for me to throw some paint at it.
Preparing Grounds for Silverpoint
April 25, 2021

The winning test panel. Silverpoint over tinted acrylic gesso, treated with GOLDEN Pastel Ground, highlighted with acrylic titanium white. 13.3 cm x 21 cm, or 5 1/4 x 8 1/4 in.
I’ve been doing a number of tests in preparation for an upcoming project. It will consist of a series of uniformly sized HDF panels prepared with a tinted ground upon which I intend to create images executed in silverpoint. These silverpoint images will be touched up with white (probably gouache). Since silverpoint does not create a strong dark line (that’s part of its beauty) I wanted to create tinted grounds that were not too dark, say, between a 10 – 20% grey value. The silverpointed strokes could softly emerge from this but never become stronger than a 40-50% value. Likewise the highlights could softly arise in the opposite direction, creating a nuanced chiaroscuro effect. Further, I imagined the hue of the background to be a terre verte. Since I planned to create a series of these panels whose grounds should be uniform I wanted to create a tint which could be reproducible across the whole series.
Relative to the ground itself, silverpoint requires a drawing surface prepared with a significant amount of “tooth” to catch the silver of the stylus. The substrate for that ground can be flexible or inflexible. The grounds for flexible substrates, such as paper or cloth, then need to create this tooth while also remaining somewhat flexible. Such grounds tend to be acrylic based (though this rule is, in itself, not inflexible). The grounds for inflexible substrates possess more latitude. They can be acrylic or traditional (based on rabbit skin glue), these latter tend to be more brittle. In the case of this project, since I had already chosen HDF, I had a range of media to choose from.
Additionally, contrary to what the word “tooth” might seem to imply, it does not so much refer to the texture of the ground as it does to its hardness. Because the silver (or any metal point) creates its mark by leaving tiny deposits of metal, the hardness of the pigment filler suspended in that ground is what provides this tooth. The carrier might be acrylic or rabbit skin glue while for the filler an array of white pigment particles may be used. These may include mixtures of chalk whiting (calcium carbonate), titanium white and/or zinc white. After it dries, the ground may be polished smooth or left with a bit of texture – artist’s choice. Experience quickly demonstrates that small, meditative motions of the stylus create soft, almost indelible lines whose value intensity increases only with repetition – not pressure.
At the outset of this project then, I had a few questions to answer:
- Since I already knew I would be using an inflexible substrate, should I use an acrylic based carrier or a traditional rabbit skin glue for my gesso? In theory, both might be appropriate.
- If acrylic, how should I introduce my tint? Terre verte in dry pigment form is known to be chemically incompatible with acrylics, so mixing up a combination of other pigments in an aqueous dispersion would be my best option.
- Alternatively, if I choose RSG as my carrier how do I introduce the tint? From a technical point of view, terre verte could be added to the dry pigment filler base of my RSG ground. However because it has such a low tinting index and its hue varies greatly from supplier to supplier, it’s not a good choice. An aqueous dispersion of high tinting dry pigments might be necessary here too.
- Whatever medium I choose, along with whatever tinting mechanism, its hue should be reproducible.
I began creating a number of test panels using different carriers and differing tinting solutions. After much experimentation I discovered:
- I experimented with adding a few blobs of tube acrylic “terre verte” to my acrylic gesso. It worked well enough for one panel but would clearly be difficult to calibrate chromatically across a large series. Also, I thought it would be a more expensive.
- By combining small but precisely measured amounts of cadmium yellow, burnt sienna, mars black and viridian I could grind up a hue that I liked. I added small amounts of distilled water until I had a paste which could be further diluted into a well-dispersed yet concentrated tinting solution.
- This hue could be reproducible across the series since I had not only maintained records of my dry pigment tints but also how much gesso base I had used (either various GOLDENS acrylic gessoes or various RSG recipes). In this way I knew how to ultimately manage my white component.
- Finally, the winner was an acrylic combination. See above, left. Though I truly prefer the haptic experience of a traditional RSG gesso for silverpoint, in this case acrylics won out. My reasons were: facility, it’s easy to use, for when you are planning on creating sixty four panels, this matters (RSG recipes can be more finicky); uniformity, the tinted, sanded surface of the acrylic ground was uniform (this was not always the case with my RSG gessoes); value, the silverpoint line was not too dark on the acrylic ground (surprisingly, the RSG/zinc white ground created a darkest line of all); line clarity/or not, a transparent coat of GOLDENS Pastel Ground applied onto the acrylic ground turned the surface texture into a rough sandpaper. In turn this made my silverpoint strokes a whispy sfumato, whereas the baby butt-smoothness of the burnished RSG grounds created fine, strong, clear lines (not what I was looking for in this project). Highlighting, washes of white gouache were well received on the acrylic ground and easily manipulated (because they were in an aqueous solution, this was not the case with the water-permeable RSG grounds). However, ultimately I opted for doing my highlights in (titanium white) acrylic since in the long run it requires less protection. Versatility, since I am beginning to imagine further (semi-translucent) coats of paint over the whole series after they are completed and fully assembled, the robust versatility of the acrylic medium seems to be the best choice.
It can sometimes seem like a lot of extra effort to do your homework like this, but it’s worse to create a whole project only to find that the materials you use don’t let you do whatever it is that you envision.
Besides, I think you have to enjoy creating mud-pies. 😉
Pastiglia – say what?
July 15, 2019

A Piece of Me #10, Source image for acrylic sculpting gel
A Piece of Me #10, acrylic sculpting gel on panel
I’m currently involved in a project that calls for sixteen panels to be pre-textured before commencing to paint them. All of the paintings are to be executed on hardboard, so I’m starting with a firm, inflexible surface. Six of these panels will be painted with either oils or acrylics so I was able to use acrylic modeling paste for them. Here to the left is a source image while on the right the relief I created with acrylic sculpting gel. Compositionally (almost like a panel in a comic book), this panel serendipitously contains three figures. Provocatively, you sense an untold story.
But for the other ten panels I planned to be using egg tempera or encaustic so I needed to prepare their surface with traditional (white chalk and hide glue) gesso. And even though the acrylic modeling paste would adhere to the traditional gessoed, the acrylic gel would not be absorbent to the egg tempera or the melted wax. So… what to do?
I’ve seen, of course, that Medieval and/or Renaissance painters would sometimes pre-texture their grounds before painting on them but it took some diligent research to find out more about their technique. My two main resources were Cennini’s “The Craftsman’s Handbook” (translated by Daniel Thompson) and Thompson’s own “The Practice of Tempera Painting”. There I discovered a technique called “pastiglia” which appeared to be what I was looking for. Cennini briefly describes using gesso to model figures and ornaments upon an already gessoed panel (pg. 76). Thompson provides a little more detail (pg. 34-35). Both suggest using gesso and a brush to model low relief forms. In addition, Thompson suggested adding a little color to the gesso so you can actually see what you are doing (!!). Good idea, Daniel, I might take you up on that. But most of the information (and use) seemed to relate to decorative frame elements which was not exactly what I had in mind. No matter. I had found the term and now I could google it.
Strangely enough, there was not much out there in internet land. But there was a wikipedia page. I’m thinking this lack is due to the fact that pastiglia is not a technique practiced by many modern or contemporary painters. Most painters paint on flexible surfaces these days and they use acrylic gesso to do so. Which, while all of that is OK, it just means that these older techniques are not only out of vogue; their internet-memes are out of time. Luckily I was able to watch a three part you tube video of a guy making a frame using pastiglia. It was instructive methodologically and emboldened me to go ahead and just go for it. Two tips I received from the video, transfer your design beforehand and instead of using a brush, pick up a syringe or two of different sizes to better control the flow of the pastiglia over the gessoed panel. So I went to my local pharmacist and got myself supplied. Now I was ready to go.
Yellow ochre transfer of the design in preparation for pastiglia.

A Piece of Me #38, original photograph.
Using the “find edges” feature of an image manipulation application I turned the colored photographs I had into black and white designs. I then printed them out to size and got ready to turn the printed image into “carbon-paper”. Note to self, never, ever, forget that photography renders the three dimensional phenomenal world into two, so “finding edges” is helpful but it cannot distinguish between a significant form and a shadow. I had already used this carbon-paper technique for the acrylic panels, so I knew where I was going, but instead of covering the back side of the paper with charcoal, this time I chose yellow ochre pigment. The reason for this was simple, previously, the dark carbon lines were great for setting out the design but afterwards it required a few coats of gesso to reclaim the whiteness I need for an appropriate painting ground. I didn’t think that I would have that flexibility after the pastiglia treatment, so I opted to use a light tonality that would provide hints but also would not be too disruptive to the final painting. Here to the right is one of my yellow ochre transfers before modeling.
Pastiglia of A Piece of Me #38.
Now it was time to set to work. I found it best to work up one area and let it dry (about 24 hours) before working on the area adjacent to it. When there was a shape that was on top of another shape, I modelled the rear form first and then the second on top of it. Relative to my source image, if it was complex, I had to select the large, most important forms. Here to the left is one of the completed pastiglia. The surface is far more delectable than the photos can suggest since it is basically white on white.
NB: the syringes that I got from my local pharmacist were incredibly helpful for manipulating the gesso’s flow to create the forms I wanted however, the action of sucking in the gesso into the syringe created those nasty pinholes that are impossible to get rid of in the final gessoed surface. Something to troubleshoot if I were to do this process again.
Troubleshooting Chalk Gesso
December 14, 2010
The first time I began creating paintings on panels using chalk gesso I had no problems. I read the manuals, ordered the materials from a good supplier in NYC and proceeded to create my panels. No problem. It was summer in Connecticut. 30 years on, the paintings I created from those panels are still alive and well.
Over the years, with other batches both in sunny, dry, warm California and later in Germany (also in the summertime), I had no problem. My batches were done using rabbitskin glue sourced from my American art suppliers (Utrecht in NYC or Bay City in SF) or later Kremer pigmente in Munich. Now, after moving to Bruges, I’m back to creating new batches of gessoed panels. But why am I experiencing such difficulty with my gesso? How strange to find myself returning to square one with what should be a relatively simple process. So, I’ve decided to document my trials and errors – for myself and internet posterity. There may be others out there who have experienced similar problems?
The problem:
My assembly process would begin normally, but as I proceeded to build up layers, the gesso would no longer flow but rather glom onto the panel. The brush would stick, the gesso would glob. When dry, a little sandpaper would remove far too much pigment. So it was clear: there was a problem with my glue.
Troubleshooting:
I generally create my panels in the wintertime. Nothing to be done about that. The house is radiator heated, that’s got to be better than whatever (winter) conditions Cennini ever experienced. We live next to a canal in an older house that does not contain double glazed windows, so it might be more drafty and moist than many modern environments, still, creating good gesso panels should be possible.
Double boiler? Yes, of course. Did the glue boil? No. Never. But after the gelatine melts, what is the threshhold temperature which spoils the glue? I researched temps on the internet and found 52° Centigrade to be the most generally noted gauge. But is that true? From my experience, it depends on the source, as RS can vary a great deal. At this point, I would not go by numbers but rather my own eyesight.
For example, a few years ago I bought a new batch of glue from my local art dealer, a man who specialized in esoteric artists materials. It seemed OK at the time but then the problem began to recur. Does RS have a shelf life? Or did I let the glue “cook” too long? I had purchased a meat thermometer and kept my temp well below 52°. Still, invasion of the glom.
For my most recent batch I used the last of my old RS from the esoteric art supply store. When I added the pigment, the paint became very granular and unattractive. I guess it does have a shelf life (even though it did not smell)… So I threw it out.
Then used the RS that I had purchased recently from Kraemer Pigmente. Little crystalline pebbles, very nice. When I ran out of the Kraemer RS (silly, I had only purchased a 100 G test amount), I bought a new batch of glue from my local art supply store (brand, Senellier). This stuff comes in pellets similar to the scat of small animals that you might find in a forest. (I prefer the Kraemer) But for both glues, I soaked them overnight (80 G RS to 1 liter of water), melted, cooled and did the finger-pressure-crevice test. So far, so good. (Though the Kraemer RS seemed firmer, clearer, less cloudy, more uniform and refined.)
I bought an electric warming plate at the local Kringwinkel (Salvation Army). It holds food warm but doesn’t cook it. 40° Centigrade or so but not higher. Great, I thought. But still, when I kept the glue-pigment in that double boiler pot for a few hours, the glue lost its strength. Oooops.
*Update from 2019. I coated about 50 small panels in traditional chalk gesso in my studio July-August 2019. I was extremely careful to melt the rabbit skin glue, add the calcium carbonate (with 10% titanium white) and create a thin creamlike consistency of my gesso. I kept it in a large jar in a double boiler bath. As soon as the glue melted and achieved the right consistency, I would remove it from the heat. I worked quickly to cover my (3 mm HDF) panels front and back, so was intent on completing the 10 thin coats in one day’s working session. I reheated my gesso as necessary (when the RS glue began to thicken) but was careful to not let it “cook”. My panels turned out fine. I’m thinking that the problems I had before were due to in attentiveness on my part. I must have allowed the glue to sit too long on the heat, adversely affecting the integrity of the RS glue. Also, completing the panels in one day’s working session insures the right amount of evaporation to contribute to the binding of one coat to its successor.
Bottom line:
- Buy the best grade of RS that you can find from an archival artist’s materials supplier (like Kraemer).
- Do the crevice test, if you want, but be sure to take it off the heat as soon as it fully melts.
- Add your pigment in the center in a stream, allowing it to gently absorb the glue and sink via gravity.
- Stir thoroughly but not vigorously.
- For uniformity, do your gessoing in one session (one day).
- Rabbitskin glue is an organic substance, containing all the resilience and receptivity of living matter, as well as it’s limitations.
Gesso
May 9, 2009
Various recipes exist for gesso. Here’s what I use:
The Glue:
Dissolve 2 3/4 ounces of dry rabbit-skin glue with one quart water in a big glass jar (used pickle jars are great for this). This equates to 75 grams dry glue to approximately one liter of distilled water. The proportions work out to approximately 10/1 water to dried glue by volume. Many professional egg tempera painters suggest a higher percentage of 16/1. (I will try this next time around.)
Let it soak overnight.
Heat the glue in a double boiler, that is, with a second pan surrounding the jar with the glue water. The water should be the same temperature as the glue water, so bring the heat up slowly to melt the gelatine glue. Stir gently. The glue should never boil, only melt. Overheating significantly harms the adhesion of the glue, so do not let the temperature rise above 135 F° (57.3 °C), 127F° (53°C) is optimal.
The Filler:
I use calcium carbonate or precipitated chalk or whiting for filler with 10% titanium white or zinc white to insure a bright whiteness to your gesso. The chalk whiting part can vary in both purity and whiteness, depending upon the grade. Industrial grade chalk whiting can be found in most hardware stores or paint shops but I currently buy my calcium carbonate from Kraemer Pigmente. Dry pigments can be found at art supply shops or online suppliers (like Kraemer).
The proportions are 1 lb filler (or 450 grams) to one quart (liter) of glue water. Or 1 1/2 filler to 1 glue water by volume. The chalk is gently poured into the melted glue. I hold a funnel above the glue water, slowly adding the filler. Ideally you should be able to add all the filler in this way until a slight pyramid of filler forms above the fluid surface. Gently stir the mixture, but be careful to avoid creating any air bubbles. They can translate into pinholes in your gesso that are impossible to remove, adversely affecting your pristine starting ground. Lumps can be stirred or strained out (with cheesecloth). The final result should be about the consistency of light cream. Return the mixture to the double boiler (as necessary), keep it warm, but never let it remain too long on the heat as this can adversely affect the integrity of the RS glue.
Applying the Gesso:
Sand the panel lightly to remove any rough texture, clean the dust off with a moist cloth. Cover the board with a light coating of size (1 1/2 oz rabbit skin glue dissolved in one quart water or 45 grams glue to one liter). After the size has dried, begin applying thin coats of gesso. The first coast is loosly brushed or scumbled in. I prefer to apply the gesso to both sides and ends of the panel to avoid any uneven absorption of moisture which might cause warping. I use a wide flat bristle brush (2″), applying thin layers in alternating horizontal and vertical layers. The layers dry quickly, especially in warm weather. Generally a well prepared panel can take about 10 thin coats of Gesso. I wait until 3 or 4 levels have accumulated and begin lightly sanding it down between layers, and then use a moist cloth to remove the dust. For proper adhesion between the layers of gesso it is best to complete your panel in one day’s working session.
Finishing:
After the final coat, the sanding moves from coarse to fine. As a last step, it’s possible to take a slightly damp cloth and rub it gently over the entire surface in circular motions in order to obtain a final smooth, egg shell-like finish. If, however, you intend to use the panel for silver point, it is best to leave that last step out in order to retain a slight tooth to the panel.

