Preparing Grounds for Silverpoint
April 25, 2021
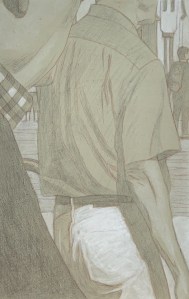
The winning test panel. Silverpoint over tinted acrylic gesso, treated with GOLDEN Pastel Ground, highlighted with acrylic titanium white. 13.3 cm x 21 cm, or 5 1/4 x 8 1/4 in.
I’ve been doing a number of tests in preparation for an upcoming project. It will consist of a series of uniformly sized HDF panels prepared with a tinted ground upon which I intend to create images executed in silverpoint. These silverpoint images will be touched up with white (probably gouache). Since silverpoint does not create a strong dark line (that’s part of its beauty) I wanted to create tinted grounds that were not too dark, say, between a 10 – 20% grey value. The silverpointed strokes could softly emerge from this but never become stronger than a 40-50% value. Likewise the highlights could softly arise in the opposite direction, creating a nuanced chiaroscuro effect. Further, I imagined the hue of the background to be a terre verte. Since I planned to create a series of these panels whose grounds should be uniform I wanted to create a tint which could be reproducible across the whole series.
Relative to the ground itself, silverpoint requires a drawing surface prepared with a significant amount of “tooth” to catch the silver of the stylus. The substrate for that ground can be flexible or inflexible. The grounds for flexible substrates, such as paper or cloth, then need to create this tooth while also remaining somewhat flexible. Such grounds tend to be acrylic based (though this rule is, in itself, not inflexible). The grounds for inflexible substrates possess more latitude. They can be acrylic or traditional (based on rabbit skin glue), these latter tend to be more brittle. In the case of this project, since I had already chosen HDF, I had a range of media to choose from.
Additionally, contrary to what the word “tooth” might seem to imply, it does not so much refer to the texture of the ground as it does to its hardness. Because the silver (or any metal point) creates its mark by leaving tiny deposits of metal, the hardness of the pigment filler suspended in that ground is what provides this tooth. The carrier might be acrylic or rabbit skin glue while for the filler an array of white pigment particles may be used. These may include mixtures of chalk whiting (calcium carbonate), titanium white and/or zinc white. After it dries, the ground may be polished smooth or left with a bit of texture – artist’s choice. Experience quickly demonstrates that small, meditative motions of the stylus create soft, almost indelible lines whose value intensity increases only with repetition – not pressure.
At the outset of this project then, I had a few questions to answer:
- Since I already knew I would be using an inflexible substrate, should I use an acrylic based carrier or a traditional rabbit skin glue for my gesso? In theory, both might be appropriate.
- If acrylic, how should I introduce my tint? Terre verte in dry pigment form is known to be chemically incompatible with acrylics, so mixing up a combination of other pigments in an aqueous dispersion would be my best option.
- Alternatively, if I choose RSG as my carrier how do I introduce the tint? From a technical point of view, terre verte could be added to the dry pigment filler base of my RSG ground. However because it has such a low tinting index and its hue varies greatly from supplier to supplier, it’s not a good choice. An aqueous dispersion of high tinting dry pigments might be necessary here too.
- Whatever medium I choose, along with whatever tinting mechanism, its hue should be reproducible.
I began creating a number of test panels using different carriers and differing tinting solutions. After much experimentation I discovered:
- I experimented with adding a few blobs of tube acrylic “terre verte” to my acrylic gesso. It worked well enough for one panel but would clearly be difficult to calibrate chromatically across a large series. Also, I thought it would be a more expensive.
- By combining small but precisely measured amounts of cadmium yellow, burnt sienna, mars black and viridian I could grind up a hue that I liked. I added small amounts of distilled water until I had a paste which could be further diluted into a well-dispersed yet concentrated tinting solution.
- This hue could be reproducible across the series since I had not only maintained records of my dry pigment tints but also how much gesso base I had used (either various GOLDENS acrylic gessoes or various RSG recipes). In this way I knew how to ultimately manage my white component.
- Finally, the winner was an acrylic combination. See above, left. Though I truly prefer the haptic experience of a traditional RSG gesso for silverpoint, in this case acrylics won out. My reasons were: facility, it’s easy to use, for when you are planning on creating sixty four panels, this matters (RSG recipes can be more finicky); uniformity, the tinted, sanded surface of the acrylic ground was uniform (this was not always the case with my RSG gessoes); value, the silverpoint line was not too dark on the acrylic ground (surprisingly, the RSG/zinc white ground created a darkest line of all); line clarity/or not, a transparent coat of GOLDENS Pastel Ground applied onto the acrylic ground turned the surface texture into a rough sandpaper. In turn this made my silverpoint strokes a whispy sfumato, whereas the baby butt-smoothness of the burnished RSG grounds created fine, strong, clear lines (not what I was looking for in this project). Highlighting, washes of white gouache were well received on the acrylic ground and easily manipulated (because they were in an aqueous solution, this was not the case with the water-permeable RSG grounds). However, ultimately I opted for doing my highlights in (titanium white) acrylic since in the long run it requires less protection. Versatility, since I am beginning to imagine further (semi-translucent) coats of paint over the whole series after they are completed and fully assembled, the robust versatility of the acrylic medium seems to be the best choice.
It can sometimes seem like a lot of extra effort to do your homework like this, but it’s worse to create a whole project only to find that the materials you use don’t let you do whatever it is that you envision.
Besides, I think you have to enjoy creating mud-pies. 😉

