Casablanca #3: the raised-relief collage level
June 3, 2026
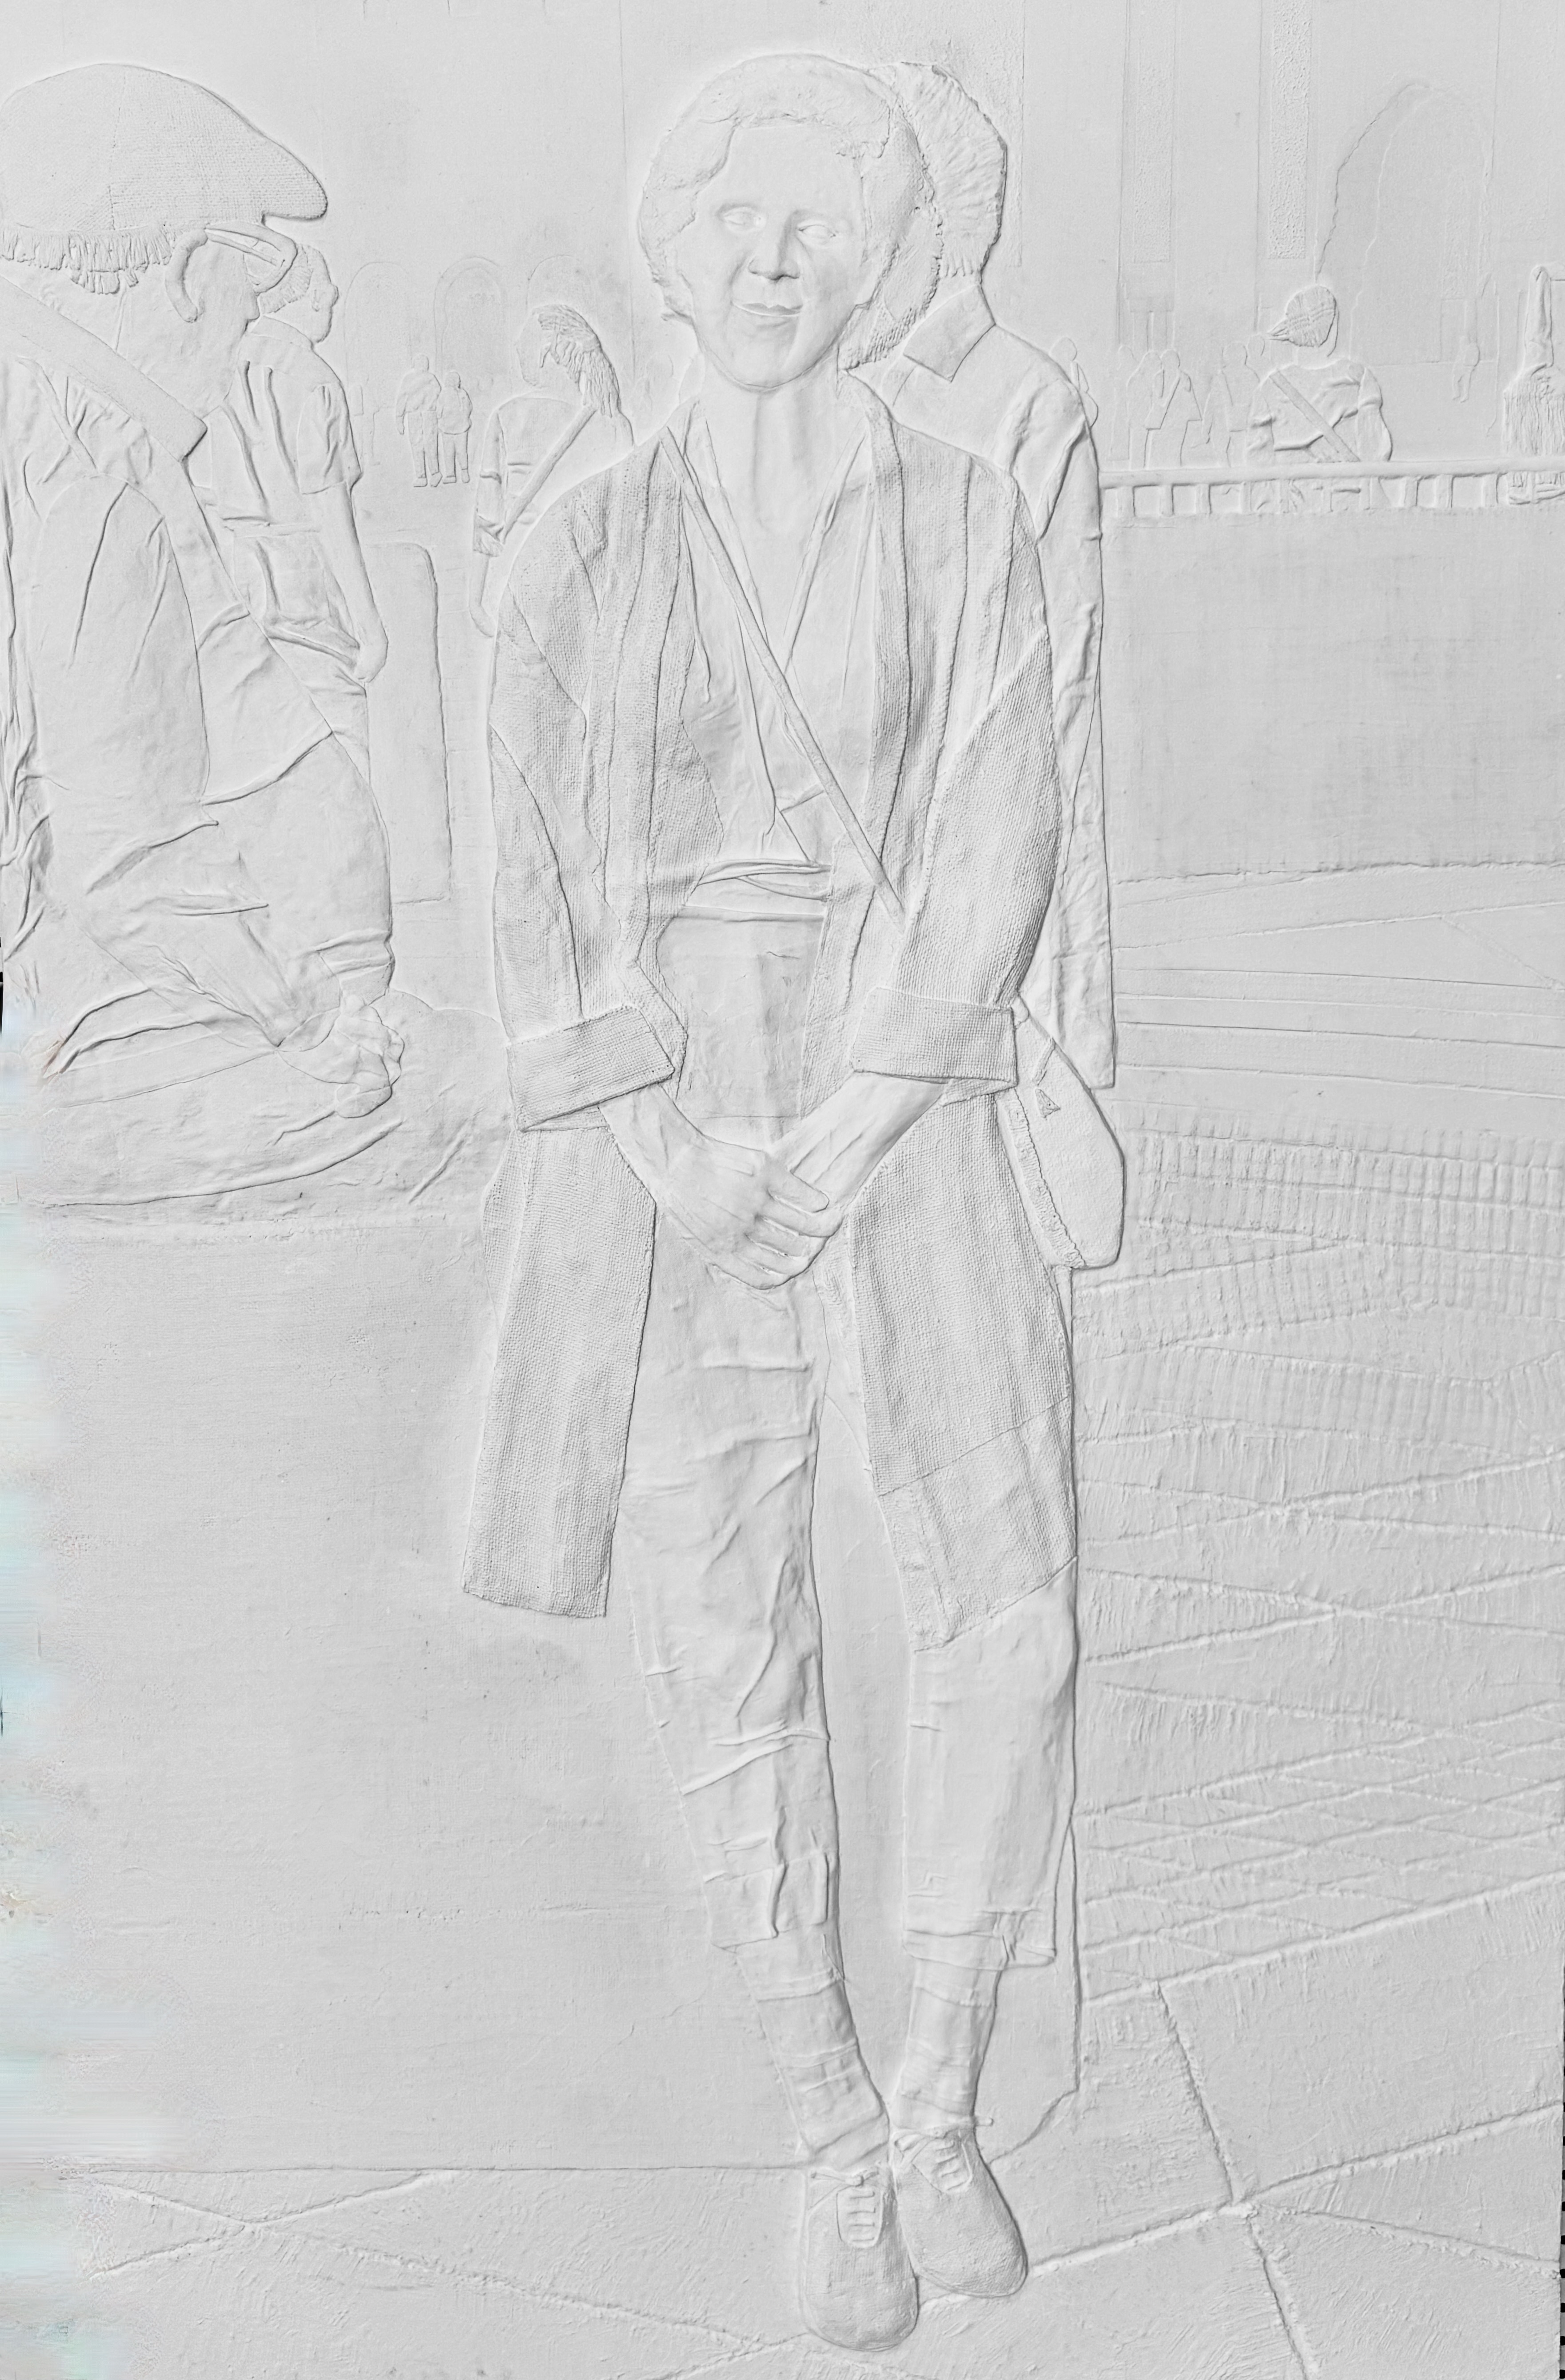
I’ve been working on a life-size (approximately 6 feet by 3.5 feet) raised relief multi-media collage for about four years (not steadily though, it’s more like fits and bursts, often with six months or more in-between). Anyway, I currently have something to show for it, see image to the left, as this level at least now nears completion.
To begin with, this raised relief is the third version of the same image (all life sized). The image itself is a photograph taken by my husband John, spontaneously, in Casablanca in 2018 (thus the name for the series). The first version I did of this image consisted of cutting up the photograph into 64 equally sized squares and painting each square separately using different techniques. I called it “Pieces of Me”.
The second version (of the same image) consisted of taking those 64 source image/squares and rendering each in one technique – silverpoint (highlighted with white acrylic paint). That resulted in a large daguerreotype image which I then abstracted by splattering with white paint, I called that version “The Peace of Me”.
But as images and the creative process goes, sometimes, as you create one piece, you already begin to envision another. I started dreaming of creating a raised relief of the whole image. No 64 squares this time, something far more unified. Rather, how about a sculptural treatment, lifting, recreating as it were, a three-dimensional reality from a two dimensional photograph? I didn’t know how to do that but thought that it might be possible by using plywood, fabric and a melange of acrylic products for fusing it all together. So I began.
What follows is a short documentation of my working method. First, I realized that the photograph itself was actually a landscape, with a foreground, middle ground and background, so theoretically, it should be possible to begin by rendering the background elements directly onto a panel in a collage-type manner. I stabilized a large piece of 3/8″ beech plywood with wooden struts on the back side and began glueing in pieces of paper, cotton, linen and burlap of various thickness, weights and textures, according to the given design. I used GOLDEN products: GAC 100 for sealing the wood, GAC 400 for stiffening and shaping the fabrics, Soft Gel Matte for gluing the fabric to the wood and Light Molding Paste for shaping the forms (as needed). The background level went relatively quickly. Within a short period of time, I had created the architectural arabesques and figures which peopled the rear of the image. I covered the whole thing with a few coats of (white) gesso so as to better see what I had. So far, so good. Next step.
I had already selected the wall plus the two figures behind the main figure as the middle ground, so I cut out an 1/8″ piece of plywood to include those elements and laminated it onto the background plywood – in the area which I had left blank for it. For glue I used Titebond Ultimate, plus wood screws to insure good adhesion, removing the wood screws after the glue had dried. Sculpting the middle level was fun too, and built upon the skills I had already acquired for creating and modeling dimensional shapes. It too, went relatively quickly. After coating this level with a few coats of gesso I was surprised both at the progress and to see the forms taking shape. Nice. I was encouraged. Still, I was entirely unsure about my ability to sculpt/render the main figure. Time to think about that – now.
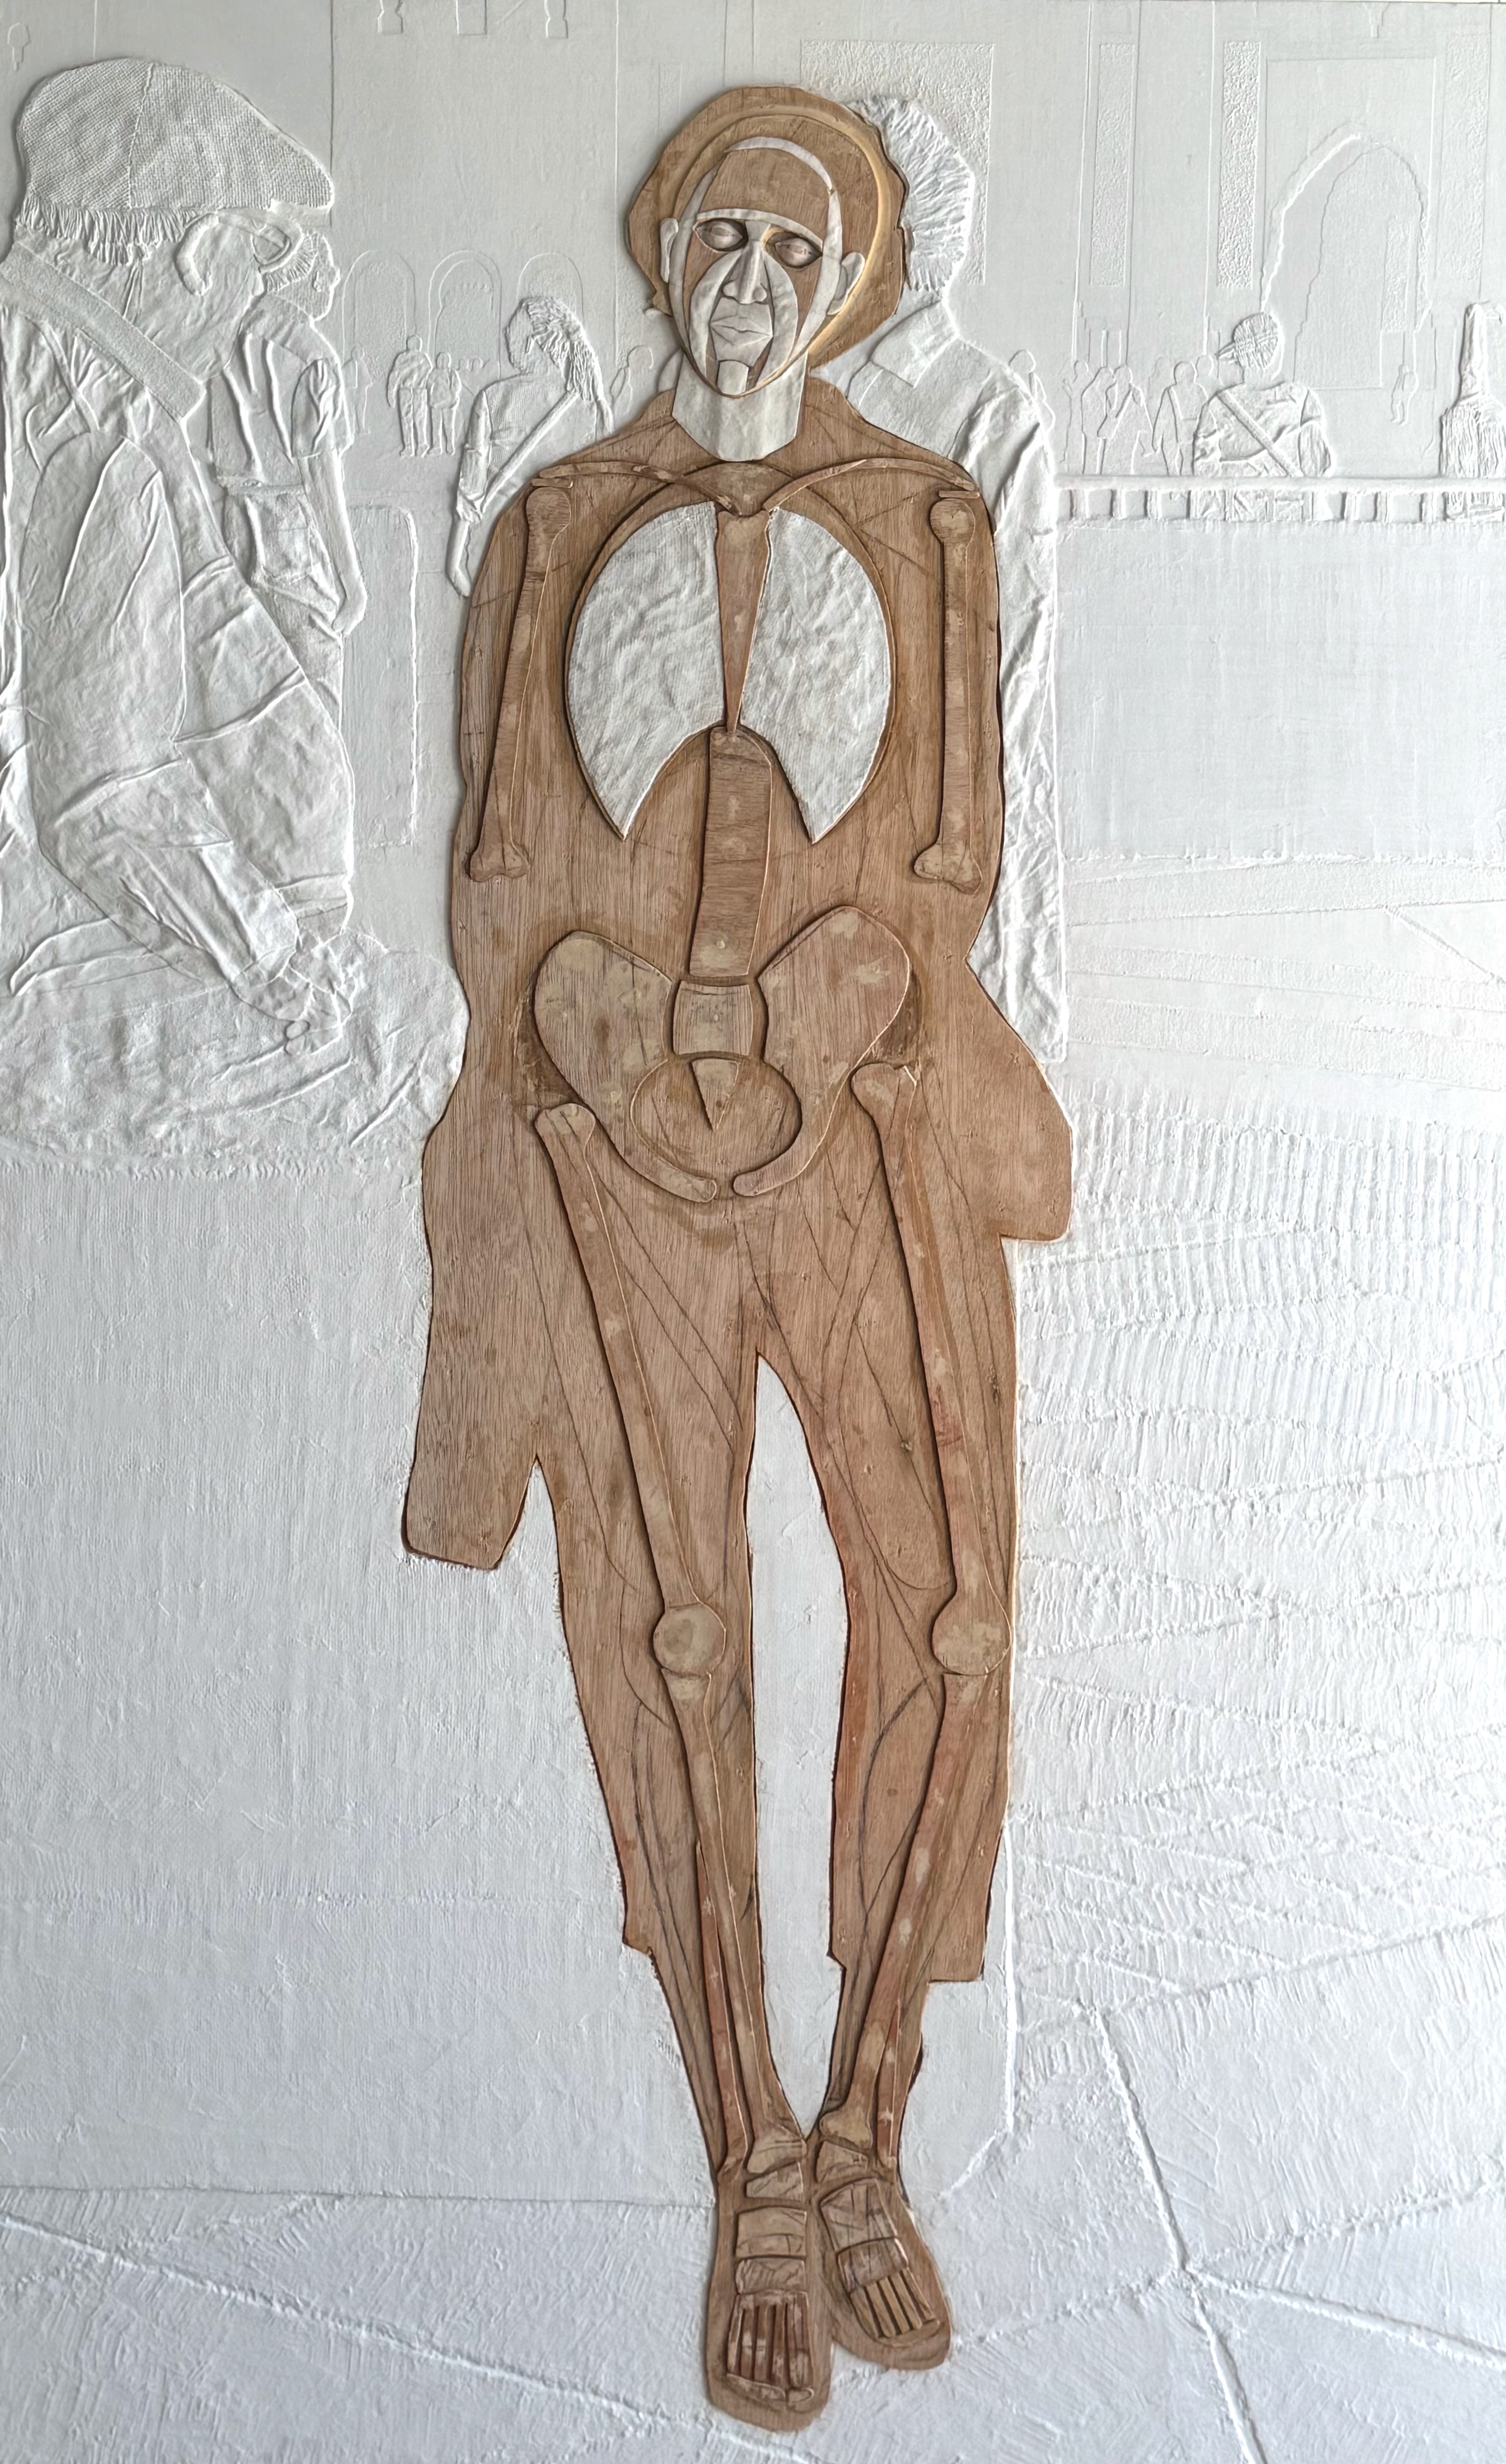
I cut another !/8″ plywood piece for the main figure and laminated in the main figure. Perhaps I could just leave it blank and treat it as an abstract shape? But no, that felt like a cop-out – even though my ultimate aesthetic aim was not realism. And since I was already deep into studying figurative anatomy and the graphical tools for rendering the human form effectively at the Watts Atelier in Encinitas, I decided to use this an opportunity to gain a deeper understanding. My first breakthrough was in discovering the clavicle notch in the photograph(!). I realized I could build the figure proportionally and skeletally using that as my navigation point. So I began creating schematic drawings. I was working from a photograph of a clothed figure which made it very difficult to see anatomy. I needed to exercise a kind of x-ray vision to discern what was where. After I got a skeletal design in that felt relatively accurate, I began laminating in a skeletal pieces according to it. I knew it would provide the form on which I could hang muscles and clothes later, see image to the right. Important, especially at this stage, was to feel the gesture.
I then began creating similar schematic drawings of muscular groupings. However, to create the muscles something different than plywood would be required. I began cutting out shapes from thick cotton according to my muscle schematic. I added Light Molding Paste to the backside of these shapes to give them dimensionality. When the forms dried, I glued them onto the skeleton. It was slow work as I felt my way forward.
At a certain point, perhaps impatient to see what I had, I began glueing in the clothing. In some places that read just fine, but in most other places it was clear that this skinny little figure would need some rounding out, some softening. Luckily, since I was working in acrylic, which is high class glue, adhesion of the successive layers was not really a problem. I used Soft Matte Gel, which is a strong glue, along with a staple gun to create the pressure needed during the drying process (removing the staples when it was dry). As time progressed it became a process of modeling using Light Molding Paste to round out a form, and then glueing back in the appropriate fabric texture using Soft Matte Gel. In some locations it went back and forth. In this way the form filled out without creating too much extra weight (always a concern for a sculpture/painting that ultimately needs to hang on the wall). I covered new additions with gesso so as to “see” what I had.
Of course, the creation of the facial features was and is always a challenge but it was a challenge I no longer felt I was incapable of meeting. Working this way with my materials: I knew how to add volume (with fabric and acrylic paste) and delete unnecessary shapes (using my trusty one-sided razor blade). This is what I have come up with for now. I’m gonna let this sit for the summer and do the last adjustments in the fall. Finally, when I am happy with the relief, not only will it be a relief but a partial monochromatic glazing/painting is planned. To be continued for sure….
I’ve already created a few pochade boxes for oil painting and written about there here and here. But late last summer I began to see the utility of creating a similar set-up exclusively for watercolors. In fact, my field explorations in watercolor had originally inspired me to create something simple and efficient for oils, now the same occurred to me, but in reverse. Since we travel a lot and I like to do watercolors on these journeys, I put on my design cap. The idea was super slim and simple.
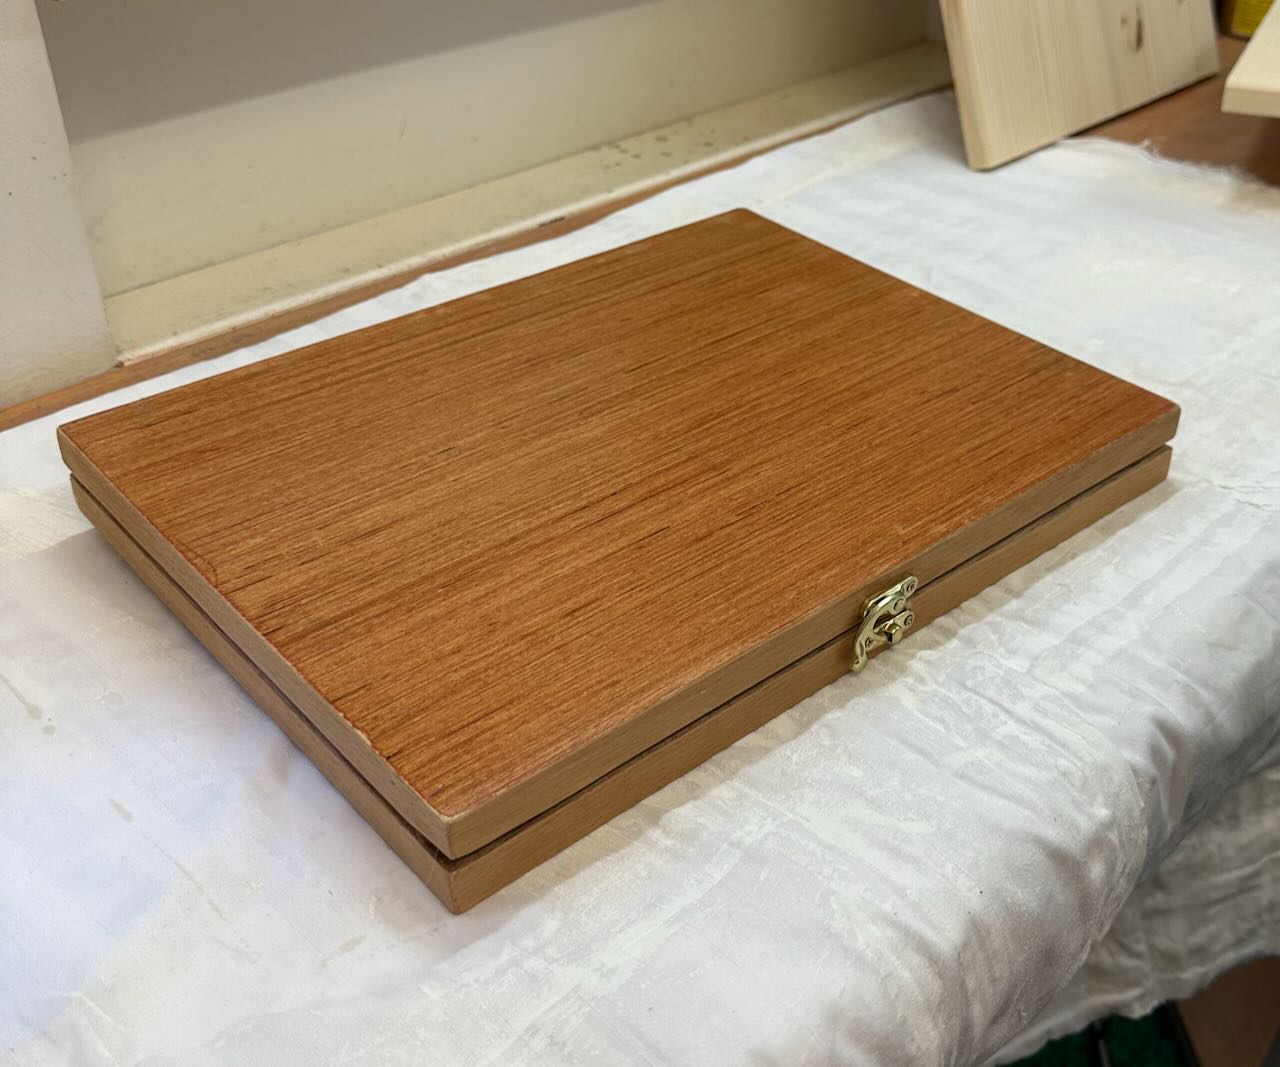
I cut two pieces of 1/4″ plywood board 3/4″ wider and deeper on both sides than a standard 9 x 12″ watercolor block. I glued in hardwood struts (5 cm x 1.8 cm) along all sides, cut to the width and depth of the plywood, as I wanted to nest a standard block inside the lid. Then I hinged it at the rear with a piano hinge (which will also create the easel’s tilt). This created a slim attractive box. I screwed in a little clasp (from Hobby Lobby) on the front side to keep it closed. Fixed adhesive magnets to the interior along the base, so that a color box, water cups and pencil box could be placed there while working.
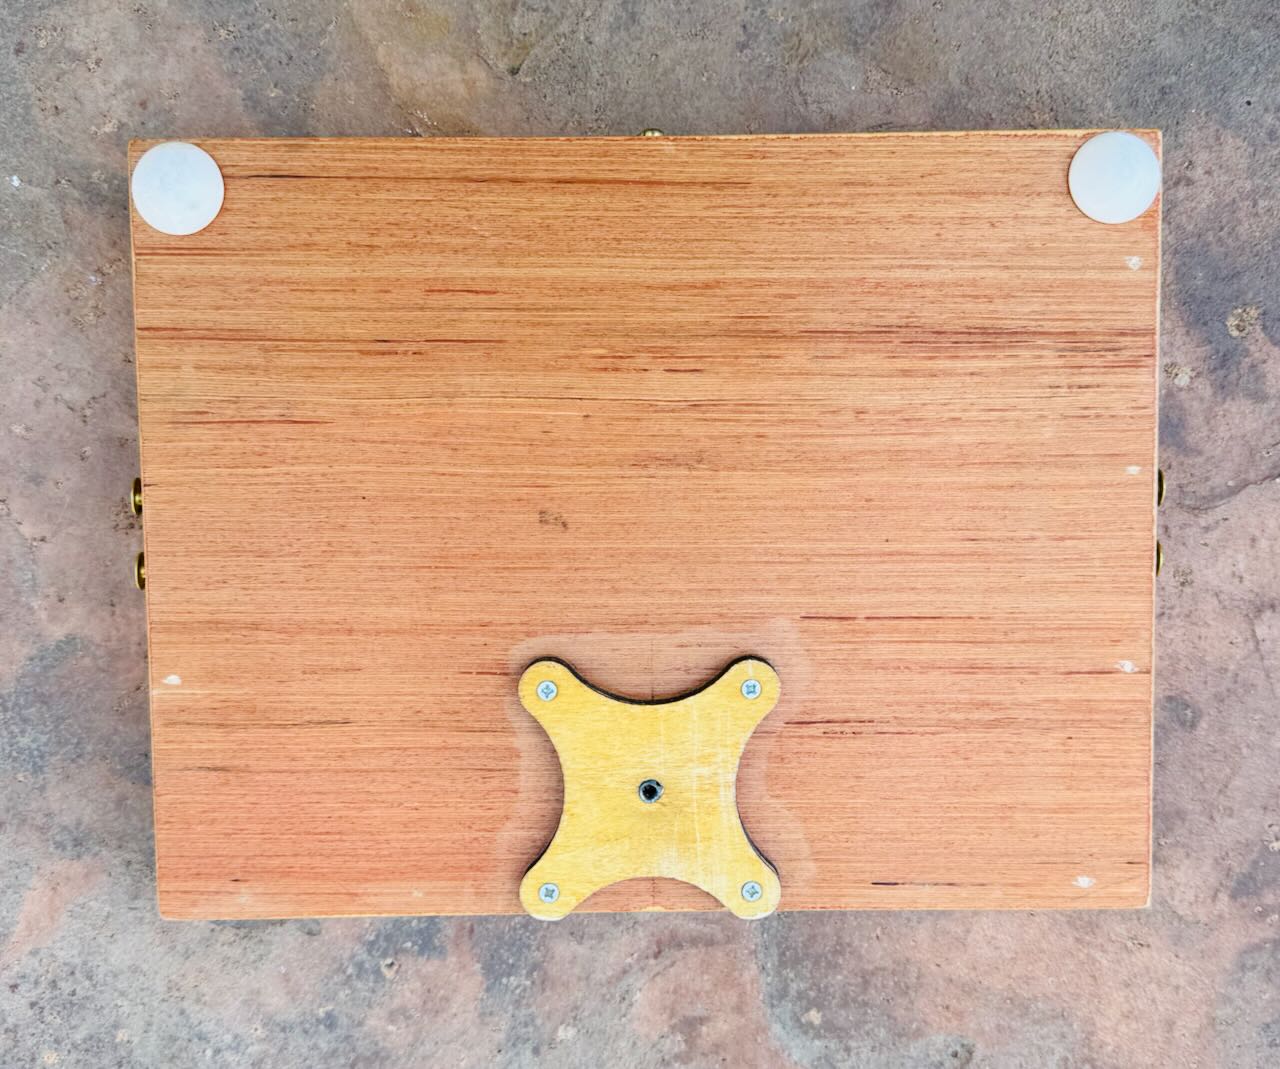
On the underside I placed a 1/4″ thick tripod bracket from Jackson’s Art Supply. This allows me to attach a standard 1/4″ 20 thread camera tripod. I also placed some 1/4′ depth round feet to the underside (along the front) so I could work at a flat table top, too. That was version I. It was just about 1″ thick. Nice!
After my first few field tests I determined the need to change a few things. I wanted to create additional depth in the interior so that the watercolor color box, cups and drawing box could fit inside not only when working but also when traveling, that is, when the lid was closed. This meant adding an additional 3/4″ or so of space between the two halves. I did this by glueing additional struts on the bottom half. I also added small removable angle brackets along the sides to keep the easel top from closing while working. Creating those brackets with my minimal tools and skill set was defo a challenge but in the end I came up with something I think quite serviceable – and elegant (enough).
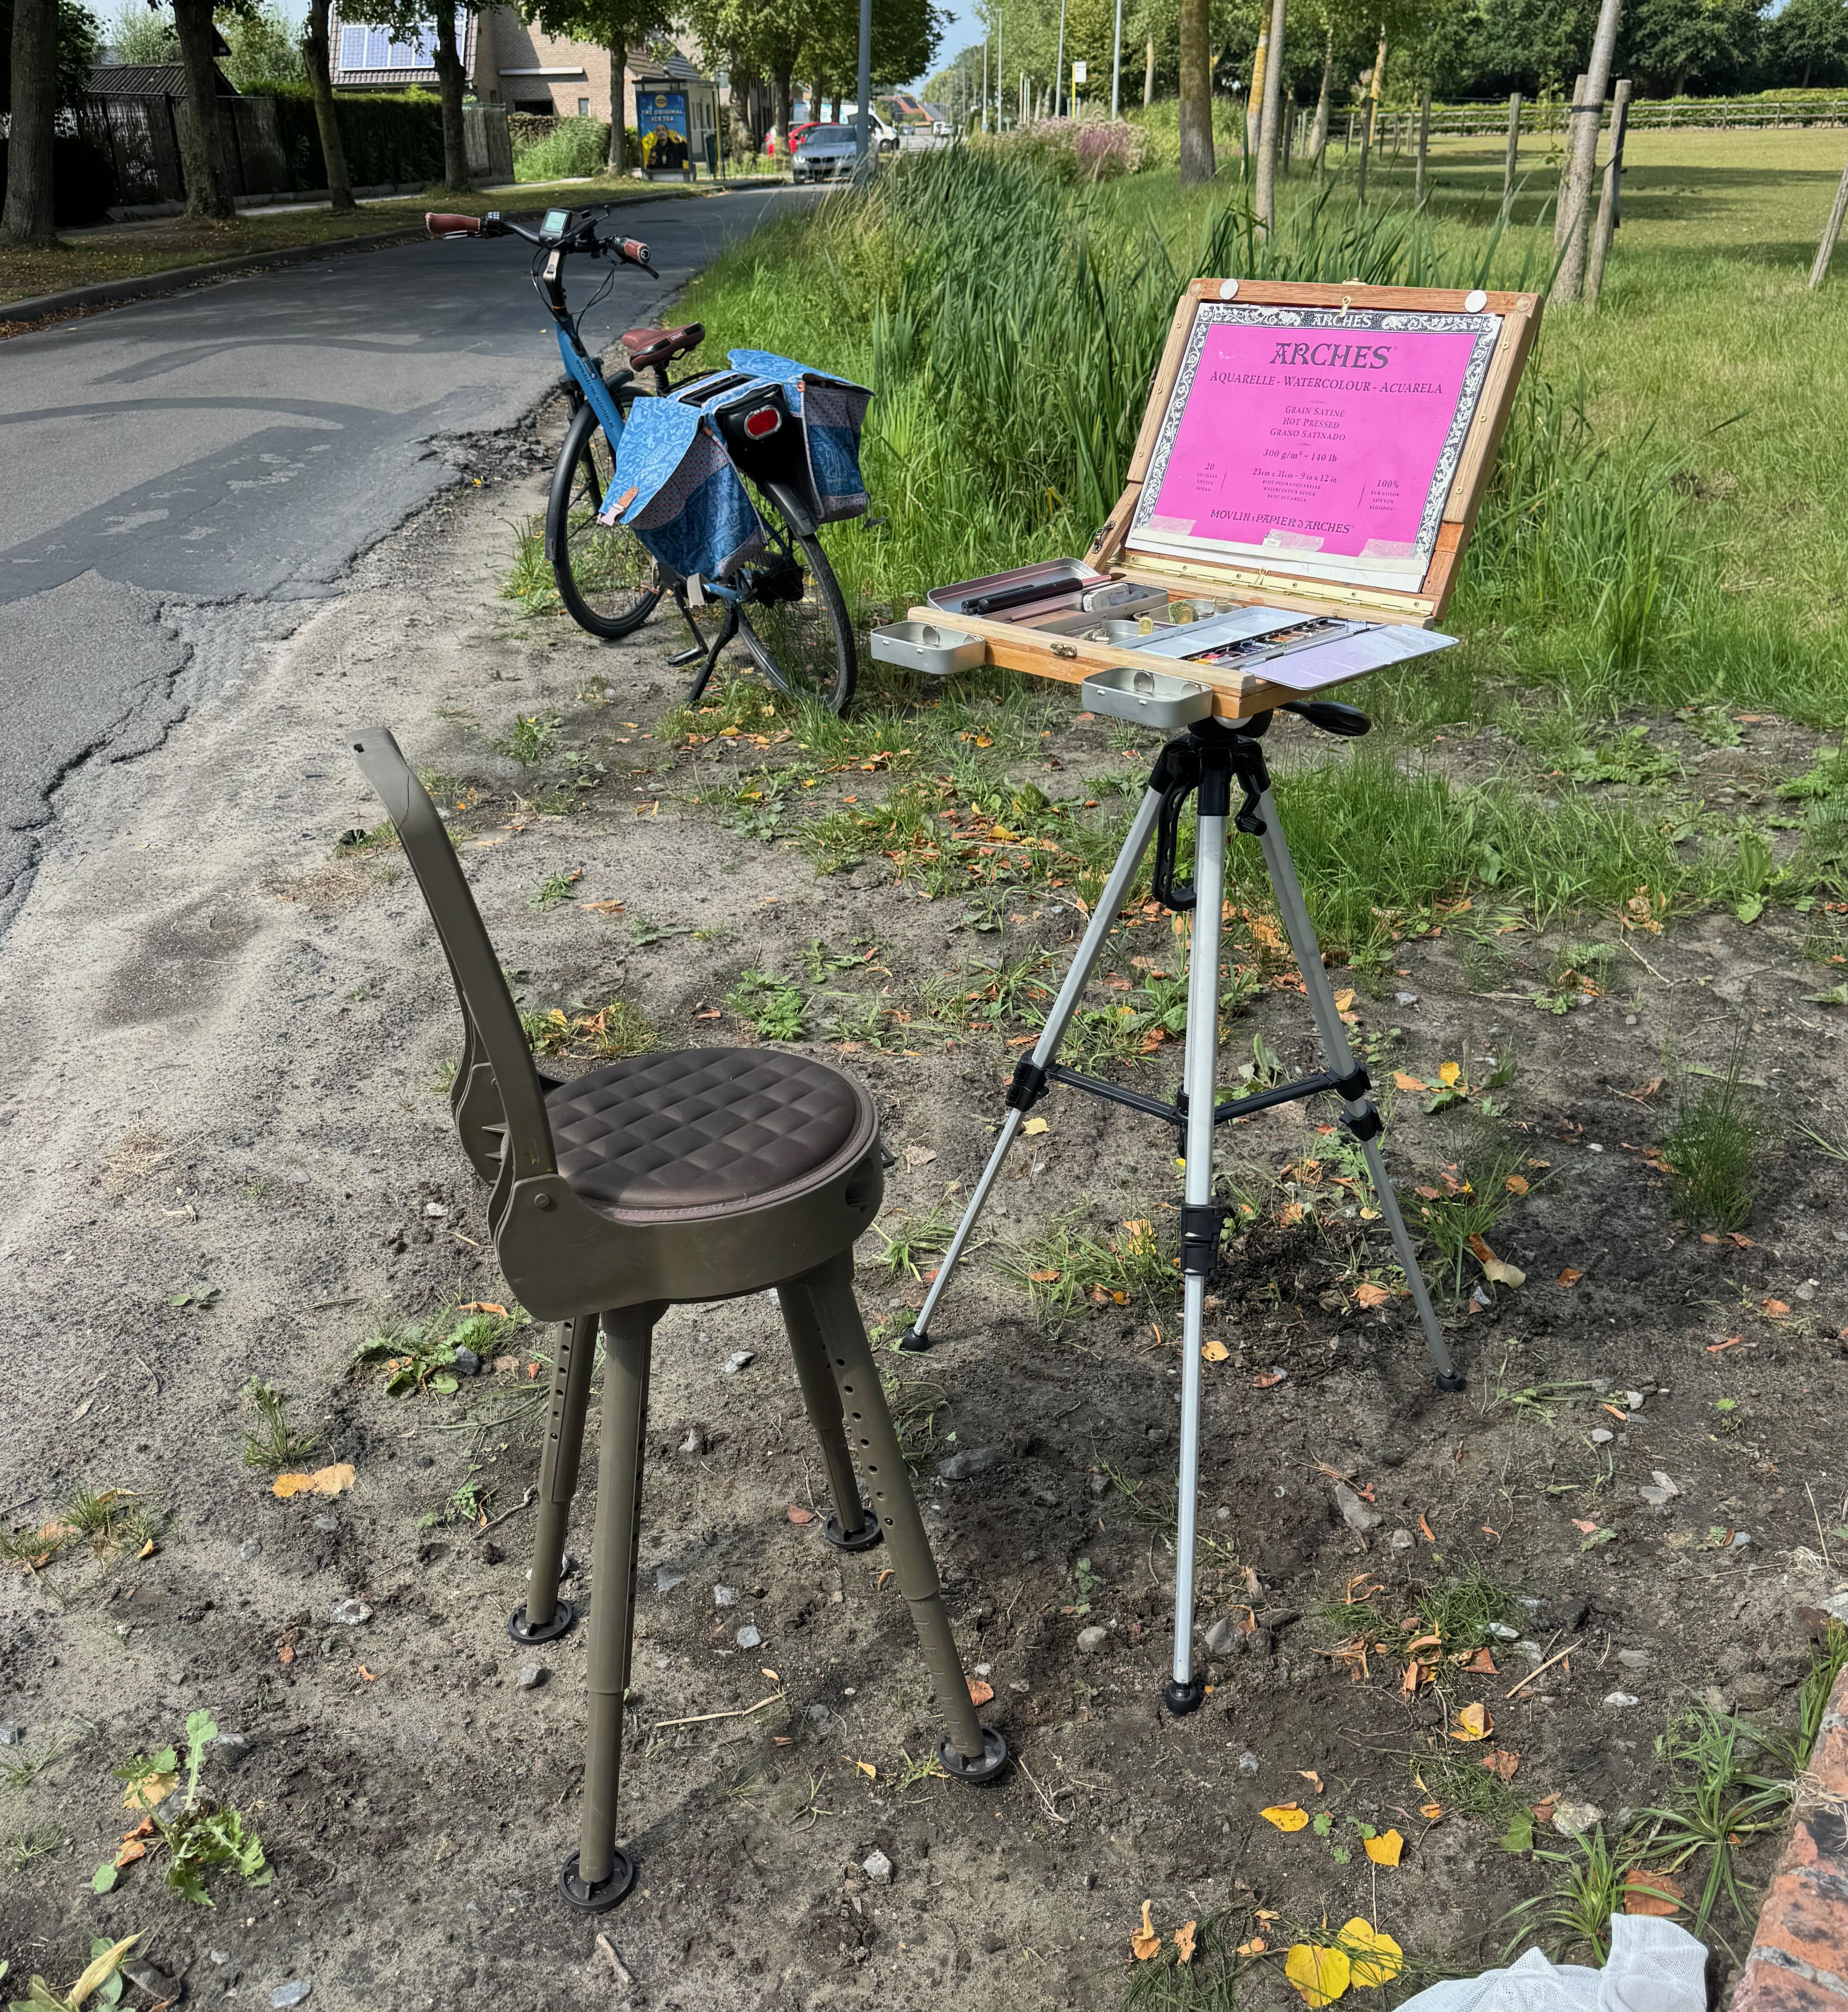
Our recent trip to the Grand Canyon was a test drive. It yielded up a few watercolors here and here along with a few happy working surprises. Having a box/easel freed up my both hands (which previously had been needed to hold the watercolor block) allowing me to draw with my whole arm (not just my hand) – and at a comfortable distance. That’s huge!!!! I was able to use my whole body to capture gesture (so it felt different), while also achieving more distance for judging my progress. I used a charcoal pencil for my initial sketch as it’s quick and sensitive, but way too dark and smudgy for watercolors. So I lightly erased that and traced in a linear drawing using a .2 H graphite pencil.
I recently upgraded this set up further to allow for a vertical orientation (of my watercolor block) as needed. Also I attached magnets to the front side so small water trays can be stationed there while working. The in situ pic here shows my folding chair, box and tripod from a recent session. Everything collapses and packs up nicely in the saddlebags of my e-bike. Adventure ho!

