Grouting and Glazing Anna
March 30, 2021

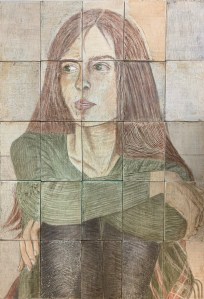
Anna Front after a few small repairs and cleaning.
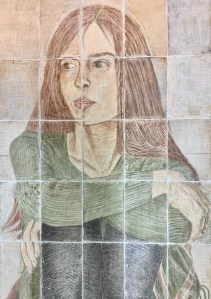
Anna, Back, unretouched underpainting.
Sometime in mid January I picked up a painting that had languished in storage for almost ten years. It was headed for the dump for three main reasons.
One, both the front and back of the painting had become chipped and damaged – mostly due to poor storage conditions. I began to clean and repair it. The front side (see linked image to the left) had already been varnished so it responded well. The back side however, which had only received an underpainting of egg tempera had been less protected. It required more extensive cleaning but also since it was just an underpainting, subsequent layers of paint might just mask the worst offenders? I hoped for a resuscitation.
Two, because it was a two sided painting (consisting of twenty five individual panels), it lacked a cohesive structure. This made viewing both sides impossible. So I set to work glueing and framing Anna. Which I describe here. Surprisingly, through that glueing I was able to create something that was now a unified substrate, and then through framing, I now had an elegant way to display it in. My hopes rose yet again.
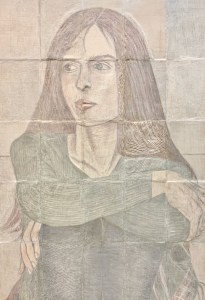
Anna Back, with her first level of grouting.
Three, because the original collection of panels had lacked that unified substrate, completing the back side (as I had envisioned it) was impossible. Now after glueing the small panels together I had what I needed. However, the grid pattern – which was clearly visible on the front side – and didn’t bother me at all there – was on the backside a technical hindrance. I didn’t want any paint/glaze seeping through the cracks. So I began to fill in the grid-gaps on the back side (with spackle). See image to the left. Then I touched up that spackle with egg tempera to match the existing underpainting. After sealing the ET with shellac, I reapplied some additional spackle and repeated my steps. Clearly, the patient was in intensive care.
Anna Back after two layers of a white lead scumble.
After everything had dried, I put on a coat of a diluted lead white ground. Its purpose was to ghost back and unify the image. The chalk gesso ground was very thirsty, especially in the grouted places, so I applied a coat of retouch varnish. Subsequently, I applied a second coat of white lead. Slowly my lady of the mirror became a luscious milky white maid, peering through her gridded dream. Now all that was left was the final blue glaze.
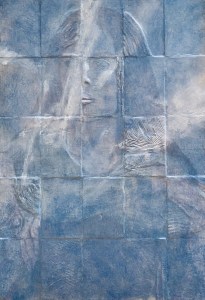
Anna Back. Oil on panels. 44.5 63.5 cm or 17.5 x 25 in.
When I felt the white ground/scumble was thoroughly dry and evenly receptive to further paint manipulations, I mixed up some ultramarine blue with glazing medium, took a deep breath and let loose. It took about 45 minutes to complete the painting. You can read about the final painting of the back via its linked image on the left.


March 30, 2021 at 9:01 am
[…] As for the painting of the back side, my idea was simple enough. Create a chromatic underpainting in egg tempera which would be a mirror image of the front, yet lighter in value, say, 50%. See left. Allow that egg tempera to cure long enough – which turned out to be almost 10 years (this was certainly not in my original planning). Then add in some white (oil) scumbles (to lighten and unify) followed by a blue glaze (with clouds) to send her skyward. But since ten years of storage – and glueing the substrate together – had intervened between these plans and today’s reality I had some additional preparatory work to do before realising these plans. You can read about it here. […]
March 30, 2021 at 2:08 pm
[…] See linked image to the left. However, due to many technical reasons which I have documented here on atelierartisanal, the back side was not completed until March of 2021. See linked image to the […]
December 27, 2022 at 5:17 pm
Loved reading this thank yoou