Individual Panel Infrastructure for “A Piece of Me”
January 14, 2021
How the panels looked from the backside.
Just yesterday I placed the last panel in position for the multimedia project “A Piece of Me”. This project consisted of an assemblage of sixty four identically sized panels which, when assembled, created one unified image. Since the original image was a (realistic) photograph, I called it – for want of a better term – Deconstructed Realism. Here on these blog pages I’ve documented various technical issues I’ve had along the way. Also on my companion site I’ve documented the paintings themselves (see link above). Both of these sets of pages were notes on the piecemeal elements. However, a technical overview of the whole project is still needed. That’s the purpose of this post (and the following one).
The back bracing of a panel with its frame glued into place.
To begin: after I had conceived of this project my first question was was what sort of (hard) board should I use as my substrate? The last time I had created such a project (some forty years ago) I was gifted various hardwood panels and a skill saw to cut them down. At the time it worked out great but the combined weight of sixty four hardwood panels along with the weight of a sturdy, one inch thick plywood backing board made for a very unwieldy piece of art. Additionally, there was the question of creating a frame – on not? Storage, too, was a problem to solve. So there was need for improvement over the pervious precedent.
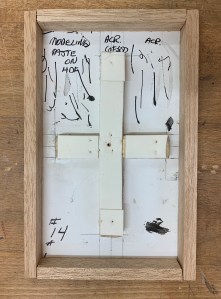
This time I decided to use 3 mm (1/8″) plywood HDF. I had the hardware store cut it to my exact size. Then because this substrate was so thin, during the prep stage I treated both sides with a number of ground coats of chalk (or acrylic) gesso (to keep it from warping). I also glued some cross bracing on the back side (see image above and to the left). This helped to minimise warping as well as offering me a convenient handhold during the painting process.So far, so good.
Yet I also wanted to visualise how the panels would look when mounted – either as individual panels or in the full assemblage. That took a few more steps.
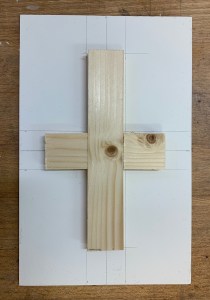
I bought some three dimensional pieces of hardwood (teak?) that measured about 2 1/2 meters in length with a thickness of 9mm x 13 mm. I cut them into 128 pieces (2x) for the panel lengths and 128 pieces (2x) for the panel widths. I glued the long sides first and then the short. This left me with an attractive frame for each panel. I’m no carpenter but for myself and my purposes, this was good enough. See above, right.
The back side of a finished panel with the backing plate screwed into place.
Bird’s eye view of a finished panel from the back side. Note the painted edge.
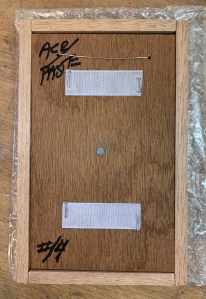
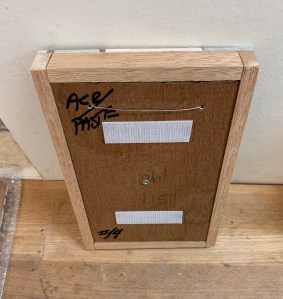
The final step entailed screwing a backing plate onto the cross-bracing so that there would be something which was flush with the frame edges but which could be used to tape velcro to. In addition I drilled two holes in these small backing plates, above the velcro, to allow for a thin wire that could accommodate the hanging of each individual panel – as a viewing installation alternative. (See image, below left.) After I had finished my test piece it weighed approximately 200 grams. Nice, much lighter than the hardwood panels of forty years ago. This is going to work.
So about one year and one half later, after completing the painting of the individual panels it took me about a month to frame each one. It then took another few weeks to install the individual backing plates. Because the panels had been gessoed on the edges, I was able to paint the edges, too, as I worked along. This seamlessly created a nice finished edge: a painted edge in contrast to a hardwood frame. (See the bird’s eye view of the backside of a completed panel below, right.) I had to work carefully to avoid damage to the front sides during all these processes and was lucky that only one panel sustained a little damage. I’ll try to renovate that one, but if not, I will have to repaint it. Not a bad batting average for a novice carpenter.
Next up, notes on the final backing board to “A Piece of Me”.


January 14, 2021 at 7:53 pm
[…] the individual panels in the “A Piece of Me” multimedia project. You can read that post here. Yet in addition to all those individual panel choices, I also had to make some decisions later […]