Encaustic and indirect painting
October 8, 2020
I just finished a series of thirteen identically sized panels executed in the encaustic technique. This was the third time in my artistic life that I have jumped into painting with melted wax.
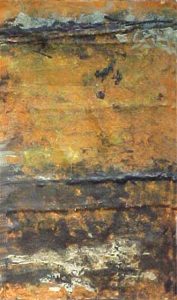
Nils, #53, encaustic on panel. 23.5 x 13.3 cm or 9 1/4 x 5 1/4 in.

Anna, #18, encaustic with collage on panel. 12.7 x 9 cm or 5 x 3.5 in.
The first time was back in 1978, with the Nils project. At that time I created approximately sixteen panels in encaustic, see one example here to the left. Relative to the technique, there was no internet to consult. I only had only my handbook from Reed Kay, The Painter’s Guide to Studio Methods and Materials. It contained useful and reliable information that I and others still consult to this day.
The next time was in 2011 so, post internet. At that time I quickly discovered that there was a vast amount of information and resources on encaustic now available. I located a youtube source which showed me on how to create my own ready-to-use cakes of clear medium (beeswax and melted damar resin). This would save me time during the painting process. Also, due to this general new-found popularity in the arts and crafts world, I discovered an electrified hobby pen for encaustic with ironing, drawing and painting nibs. In this way my use of the technique received a leg up (or two).
And then there is today, 2020, where my own education continues – as well as the proliferation of internet resources. Most of what you will discover with a quick Google is a collection of enthusiastic arts and crafts blog sites. I found them to be very informative but also a little superficial. Very few, if any, address the deeper complexities of using melted wax for realistic rendering. Yet since that has always been my interest I would like to address how I have tried to do that with this most recent series of panels. The subject matter is a given, the rendering of it is the challenge.
Ground
Of course, first and foremost, the main issue is the relationship between the support, the ground and the paint. The support should not bend; the ground should be absorbent to the melted wax. I use traditional chalk gesso ground on a 3 mm hardboard panel. That is standard practice. You can buy fully prepared $$ Ampersand panels in art shops but also you can create your own. I have always preferred the latter.
Underdrawing
I consulted the University of Delaware MITRA forum experts about my choice of materials for the underdrawing. They affirmed my intuitive choice of india ink but warned me from using egg tempera for the underpainting. So I used charcoal to transfer my designs and then laid them in with india ink. After the india ink was dry I used a kneaded eraser to erase all traces of the charcoal. That left me with thirteen highly graphic panels, resembling the individual panels of a comic book. But what about the underpainting? Because encaustic is such a viscous, opaque technique would an underpainting be of any help? And was it even necessary? Also, beyond the bare function of outlining would the underdrawings I had already done prove useful? I did not know.
Underpainting
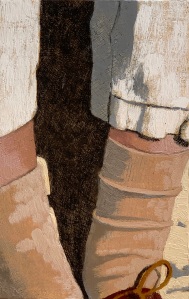
A Piece of Me #53, encaustic on panel. 21 x 13.3 cm or 5 1/4 x 8 1/4 in.
So I decided to forego the underpainting. Instead I opted to cover each panel with a beginning layer of yellow ochre imprimatura. This was achieved in two steps, first by melting up some yellow ochre paint and slapping it on, then by warming up the iron covering the panel with some cheesecloth and melting it back off. That produced the effect of burning in a yellow ochre glow into the chalk gesso ground. It provided a middle-value, warm starting position, without much wax. Highlights could go in one direction, shadows in another. As the panels progressed, I learned more and more how to make use of my underdrawing. I allowed it to peep through here and there, adding a level of built-in dimensionality and graphical contrast to the shadows. I also learned how to make use of the imprimatura. In the highlights I allowed it to show through on occasion.
As the panels developed in complexity of subject matter I began to reconsider the underpainting question. This happened quite by accident. I had painted a panel with a variety of hues and values. But it was too coarse for my purposes so I decided to (gently) melt it off. I warmed up the iron and covered the panel with cheesecloth. The paint melted quickly into the cloth. Perhaps too much? Yet as I removed the cloth I saw that in the process I had created an underpainting(!). The main masses had melted into the gesso. It would now take only an additional hour or two of fresh impasto to rebuild significant highlights and shadows, add in the final linear touch ups, then I would be done. And I was – for that panel at least. You can read its full story here.
This then became a way forward for me whenever I wished to create an underpainting for more complex compositions. So, underdrawing, underpainting, not to mention collage or pre-sculpted relief can truly enhance encaustic’s ability to describe form in a visceral yet realistic way. I think it goes without saying that this type of preparatory underwork has little significance if you are interested in using encaustic for purely abstract purposes. But then again, maybe not? Show me, baby, I’m open to it. 🙂


October 11, 2020 at 7:30 am
[…] melted wax. I’ve learned a number of new tips and tricks many of which are best summarised in my recent post on my companion website atelierartisanal.com. I also have understood how important it is to […]
October 11, 2020 at 7:46 am
[…] of the overall project here. Technical write up of using encaustic for an indirect painting technique […]
October 11, 2020 at 7:46 am
[…] will be interesting to see how it integrates into the final assemblage. Technical write up of using encaustic for an indirect painting technique […]
October 11, 2020 at 7:47 am
[…] can be so interesting. We’ll just have to wait and see. Technical write up of using encaustic for an indirect painting technique […]
October 11, 2020 at 7:48 am
[…] write up of using encaustic for an indirect painting technique […]
October 11, 2020 at 7:50 am
[…] of the entire project here. Technical write up of using encaustic for an indirect painting technique […]
October 11, 2020 at 7:50 am
[…] of the overall project here. Technical write up of using encaustic for an indirect painting technique […]
October 11, 2020 at 7:53 am
[…] hours of work. One and done. Technical write up of using encaustic for an indirect painting technique […]
October 11, 2020 at 7:54 am
[…] of the whole project here. Technical write up of using encaustic for an indirect painting technique […]
October 11, 2020 at 7:55 am
[…] of the whole project here. Technical write up of using encaustic for an indirect painting technique […]
October 11, 2020 at 7:56 am
[…] of the whole project here. Technical write up of using encaustic for an indirect painting technique […]
October 11, 2020 at 7:56 am
[…] write up of using encaustic for an indirect painting technique […]
October 11, 2020 at 7:57 am
[…] and hang it on the wall. There’s your contemporary piece of art. Technical write up of using encaustic for an indirect painting technique […]